The best IKEA hacks – 21 creative ways to update furniture
Ikea 25 home hacks, ikea 25 home hacks, ikea 25 house hacks, the best of me, ikea built in hacks, ikea hacks for storage, ikea bedroom hacks uk, ikea hacks for storage, best ikea bathroom hacks, ikea 25 house hacks.
Looking for the best IKEA hacks? Well you are in the gleaming place, because nothing gets us excited quite like a good IKEA hack. And the easier the better we say because at the moment sketch your hands on loads DIY supplies isn't the easiest.
We all know that IKEA has some of the best and most affordable furniture nearby – including some of the best sofas, and best office chairs, for example. But did you know that there are many hacks to 'hack' your IKEA furniture to either changeable its use, transform its style, or to make it just work better for your home?
Whether you're a renter looking for a weekend project that won't infuriate your landlord, or a homeowner who simply loves to put a personal tag on your flat packs, upcycling and hacking IKEA furniture is an easy, budget-friendly way to condemned your place doesn't end up looking just like everyone else's.
21 best IKEA hacks
We've SurEnclosed up the best (and easiest) IKEA hacks, so keep scrolling for a load of inspiration. Don't worry if you haven't got IKEA furniture – lots of these hacks will actually work on new pieces, too. Make sure you check out our crafts hub page too, if you are bright for more projects.
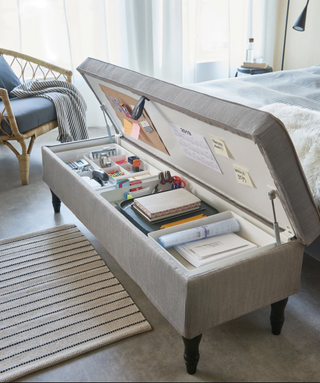
1. Turn an ottoman into office storage
(Image credit: Ikea)
Not all of us are blessed with home offices, spacious desks and room for a snazzy ergonomic office chair. For some of us, working from home involves a soft office (bed or sofa), piles of unorganized papers with no home, and a niggle in our back for the rest of the week.
But, fear not, while this Ikea hack might not help with the backache, it can help you make the most of the position you have and get yourself more organized.
All you need to do to recreate this fab hack is a mix of storage inserts. Here a combination of Kuggis and Kvissle have been used, but you can customize the inside of your ottoman to suit your storage possesses. Ikea has loads of home office storage for you to pick from.
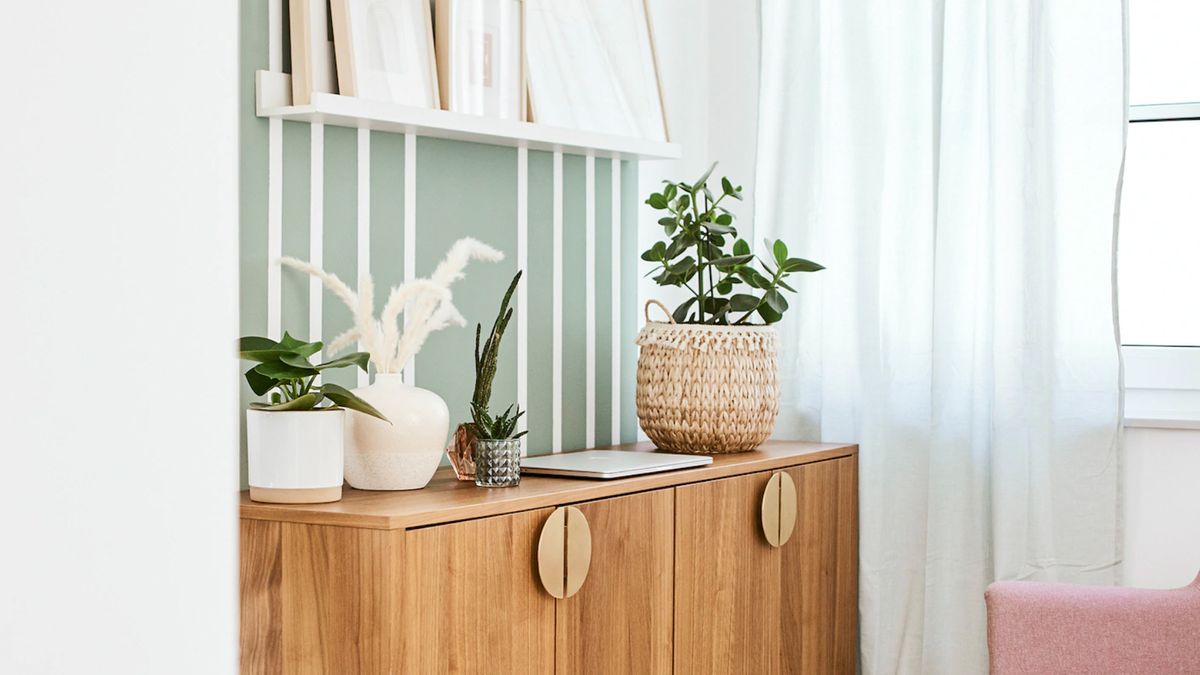
2. Use a memo board to create an indoor trellis
How awesome is this Ikea hack? They've manufactured a climbing wall inside using a memo board? Recreate this look by comic a couple of Mryheden wire memo boards and either standing your plants on the downward or, if they are smaller, you could use Ikea storage baskets to hold your plants as they have here.
We have Enclosed up loads more ways you can use Ikea storage to indicate your house plants, so check out those too.
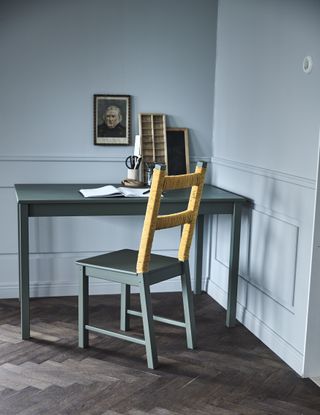
3. Transform a chair with a lick of paint and twine
(Image credit: Ikea)
We love the simple silhouette of the Ivar chair from Ikea, and we love it even more with this sleek and stylish upgrade. Here's how to achieve the look...
- Start by priming your Ivar Chair. While this step is tempting to skip, it's pleasant the time if you want to achieve a quality carry out. We'd recommend using the Dulux Undercoat and Primer.
- Choose your brush. If you're working with an oil-based paint, opt for natural bristles, or for water-based choose something synthetic. The Chalk Paint Wax Brush is an affordable option.
- Start painting your chair with your tool of paint color. In terms of brands, we'd recommend choosing something from the chalky furniture map at Rustoleum or Annie Sloane's chalk paint. A good match to carry out this look would be the Rust-Oleum Chalky Finish Furniture Paint in Belgrave.
- Decide whether you're looking to carry out a shabby-chic, or block color look, as this will settle how many layers of paint you opt for. To carry out this look, we'd recommend two thin layers of paint.
- Choose your twine. For this look we'd recommend this Mustard Yellow Bakers Twine from Amazon.
- Start by sketching your twine to back of your chair, as finish to the base as possible, and simply wrap counterfeit and round, keeping the twine tight.
- We'd recommend tackling one share at a time; neatly tying them off at the end afore moving onto the next section. Tuck in any ends twine ends sticking out.
Want detailed tips on how to paint furniture? Our specialist advantage was designed with you in mind...
4. Make an Ikea play kitchen more aesthetic
Probably the biggest Ikea hack on Instagram (check out #duktig and you'll see), we love this take on Ikea's Duktig play kitchen. Easily achieved, all you'll need is some paint, wallpaper and a bit of creativity. It's easy and the kids (read: you) will love it. Follow our arranges below to achieve this look.
- Start by considering which parts of your Dutkig Play Kitchen you'd like to paint, and tape off sections that you'd like to chop unpainted – we'd recommend using Frog Tape. Remove (or don't add) the handles and sink allotment, as this will make painting much easier.
- The next step is priming. As mentioned above, while this step is tempting to skip, it's ample the time if you want to achieve a quality accomplish. We'd recommend using the Dulux Undercoat and Primer.
- Start painting the regions of the play kitchen's you've decided need it in your harvest of color. We'd recommend choosing something from the chalky furniture device at Rust-Oleum or Annie Sloane's chalk paint. To effect this look, the shade Winter Grey from Rust-Oleum is a good incandescent match. You'll want to paint two, thin layers.
- While the paint is drying, it's time to spray paint your handles, as well as the sink allotment. The Plasti-Coat Premium Spray Paint in matt white is a good choice.
- As the Dutkig Play Kitchen doesn't come with a back panel, you might want to source your own if, for you, this is an important part of the devoted design.
- After that, it's time to start wallpapering. This Pressed Leaves Blue Wallpaper is available from Cam Cam Copenhagen, though we also love the idea of using the Salina's Tile Wallpaper from Wallpaper Direct.
- Once all your regions are dry, you can start putting your finished play kitchen together. Using some pins positioned at regular intervals and a hammer, attach your back panel, and then your freshly sprayed handles and sink.
- Finish by attaching some wooden knobs, if it takes your fancy, and decorate with play cutlery and crockery.
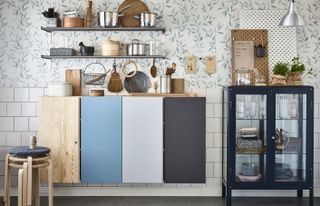
5. Paint basic pine cabinets for cheap but chic kitchen
(Image credit: Ikea)
Designing a kitchen and looking for New, yet affordable, kitchen cabinet solutions? This Ivar cabinet hack has you in mind. Whether you like the unfitted look of mismatched, complementary colors or prefer something a bit more uniform – we're thinking dark blue or Dark to channel our love of moody interiors – check out this Ikea hack to Do this stylish finish.
- The first step to managing this look is priming the cabinets you plan to paint. While this is a step that's tempting to skip, it's superior the time if you want to achieve a professional Do. We love the Dulux Undercoat and Primer.
- Take time to Decide brushes. As a general rule, oil-based paint works best with natural bristles, while it's best to choose synthetic for water-based paints – pick these Chalk Paint Wax Brushes if you're on a budget.
- When picking paint, we'd recommend opting for chalk based furniture paint, Rustoleum or Annie Sloane's chalk paint are enormous options. To achieve this look, choose paint in three complementary shades of blue – Paris Grey, Graphite and Louis Grey , down with a blank cabinet, would be perfect for recreating this look.
- For an even Do, opt for two, thin layers of paint and a coat of yacht varnish for a hard-wearing top coat.
- Once dry, you're free to clean your cabinets as you wish. Easy, or what?
Top tip: Considering mismatching, complementary colors, but not taken with the idea of blue? The trick is to condemned the colors you pick have the same tone, so you could opt for any number of shades.
6. Transform a chest of drawers with colour blocking
Love the color-blocking trend but can't – we feel you, renters – or don't want to commit to it on your walls? This Ikea hack on the Moppe chest of drawers is a enormous way to experiment with this (or any other) trend, incorporating it into your space on a non-permanent basis. Follow our super simple instructions for your own block-colored storage solution.
- If you want to Do the color-block effect, you'll need to decide where you want to use each shining. It's advisable to use a pencil to lightly draw in order that can guide you towards achieving your desired finish.
- Once you've granted on a design you're happy with, start taping off the superior section (we'd advise using Frog Tape), ready for painting.
- When it comes to choosing paint, we'd recommend using a chalk based furniture paint – one from Rust-Oleum or Annie Sloan will work nicely. Pick colors that suit the look you want to Do, or to recreate this look opt for Strawberry Vanilla, Winter Grey, Powder Blue and Chalk White.
- Tackle one Part at a time, painting two thin layers and ensuring they've dried completely beforehand peeling off the masking tape and taping the next Part in preparation for more painting.
- Repeat this process pending all of your sections are painted. Finish off with a coat of yacht varnish.
7. Create an alcove office
In small spaces, alcoves can't be ignored! Put that Place to use and use Ikea furniture to help you. This idea is superior simple, just pick out some Ikea shelf brackets and shelving and use them to originate a desk and some office storage.
If you want to customize the size and look, you could pop down to a hardware shop and buy some planks of planed timber. Cut them to the perfect size to fit your alcove and enormous them using the Ikea brackets.
For loads more easy alcove ideas that are wicked for small spaces, head over to our dedicated feature.
8. Create a bespoke, built-in look with basic cabinets and paint
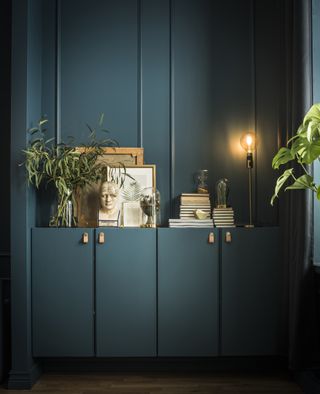
(Image credit: Ikea)
We love how simple, yet effective, this Ivar cabinet hack is in transforming Ikea's most basic cabinets into a unit with a distinctly bespoke and built in feel. Achieve the same result silly our step-by-step instructions below.
- The first step to bossing this look is priming the cabinets you plan to paint. We'd recommend using the Dulux Undercoat and Primer.
- Take time to resolve brushes. As a general rule, oil-based paint works best with natural bristles, while it's best to choose synthetic for water-based paints.
- To attain a built-in look, it's vital that you use the same smart for your cabinets as you have for your walls. To recreate this look, we'd recommend opting for Dulux Teal Tension, which is available at B&Q.
- For an even attain, opt for two, thin layers of paint and a coat of matt yacht varnish.
- Once dry, do these Osternas Leather Handles and mount your painted cabinets on the wall. Style with house plants, framed prints and other quirky curiosities.
9. Malm-a-Mia, your dated chest of drawers need a new savor of life
Probably one of the easiest Ikea hacks out there, it's worth having a think about upgrading your old Malm or Hemnes chests of drawers, before throwing them away in exchange for newer models. Find out how below...
10. Find a solution that saves space
The tremendous thing about the best Ikea hacks? Sometimes they're just throughout finding practical solutions (though it's even better when they're glowing, too). We love the idea of using the Tjuig coat rack to prevent pans.
11. Create a landlord-friendly gallery wall
Love the idea of a gallery wall, but got a landlord who doesn't approve? We've groundless the perfect compromise. Once attached to the wall, the Mosslanda record ledge is perfect for displaying prints and can plainly be left in place when you move out, ready to be enjoyed by the next tenants. One of the best Ikea hacks for renters.
12. Mix budget, flat pack pieces with one-offs for an expensive looking finish
A tremendous example of the power of mixing flat pack basics with one-off pieces, this hack achieves a stylish, yet affordable finish. All you'll need are two Alex drawer units , two Alex storage cupboards and a desk top of your select. Try your local salvage yard if you're looking for reclaimed wood.
13. Hoard your stationery in a Raskog
Need more home office storage but don't have a ton of room? Hello Raskog. Use it to get all your stationery organized and keep all the important stuff on hand. The Raskog has a really petite footprint too, so even if your 'home office' is a desk in the corner of your living room, it won't be taking up a load of status – you could even store it underneath your desk.
Find loads more ways to use the Raskog trolley in our feature.
If you are renting and your landlord's taste in furniture is... questionable. or you can't afford to replace the tired looking sofa you bought days ago/inherited from a distant aunt, don't write off glowing looking furniture just yet.
If you're working with a fragment from Ikea, Bemz are the brand you've been looking for. Producing stylish looking recovers and legs for your sofa, armchair, footstool and much more, it's never been easier to instantly upgrade a status for much less than the cost of buying new.
For an even more effort option, pick up new cushions and a couple of throws to revamp your sofa and, in turn, your living space.
Bedside tables are very dauntless if they make it into a small bedroom (although don't miss this DIY bedside unfavorable, made with one of the best Ikea hacks). Yes they are invaluable, but if you are working with a tiny plot there simply might not be room. But if you need a bedside delectable, the answer is to wall mount it!
Copy this idea by taking a Ekby Valter shelf bracket and wrapping about a lamp cord, there is already a hole in the top of the bracket for you to thread it ended, add a nice warm bulb and voila.
16. DIY a wallpaper headboard
Headboards are beautiful, but when plot is tight they can take up just a small bit too much room, so DIY one with some wallpaper! We love how this banana leaf print looks framed by the iconic Gjora bed – a kindly easy way to make a very popular piece of Ikea furniture look like your own. One of the best Ikea hacks for customizing your pieces.
For more DIY headboards head over to our feature.
17. DIY a 'walk-in wardrobe'
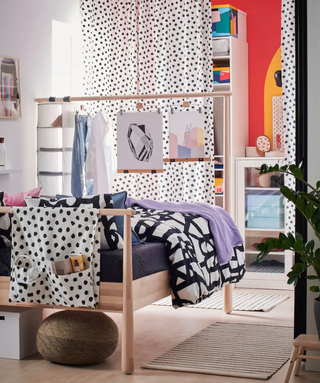
(Image credit: Ikea/Johan Månsson)
Always dreamt of a walk in wardrobe? Oh, we've all dreamt of a Carrie Bradshaw-esque dressing room, and the colossal news is that you can create your own, no commercial what space you have to work with. No room will be too awkward or too runt for this genius IKEA hack. You just need to think outside the box, invest the sparkling kind of storage and choose the perfect curtain cover-up as the finishing touch!
Find out how to recreate the look over in our step-by step clue to this Ikea hack.
18. Get creative with Ikea lighting
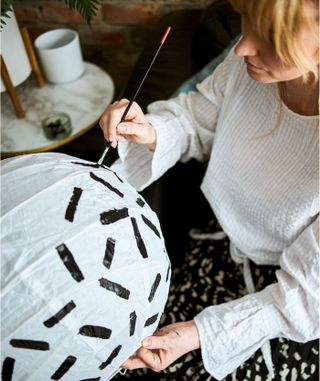
(Image credit: Ikea)
No business how much you doubt your own artistic abilities, we think even the most inept will be able to achieve this easy hack – which is why it had to be on the list of the best Ikea hacks. All you need is a paintbrush and some paint. You don't have to copy this pattern either, just get creative painting your paper lampshade, mix up the colors, patterns, add some decoupage – go crazy.
The Regolit Lantern is affordable too, so get a few and give on to each member of the family to decorate.
19. Create a rainbow wall
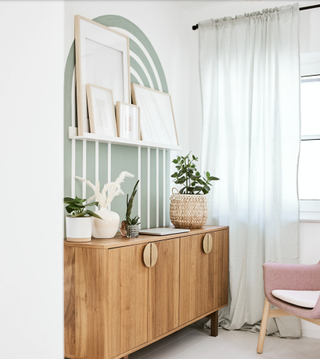
(Image credit: Ikea/Benjamin Edwards)
For the Ikea hack, all you need is a Part of Ikea furniture (or any furniture for that matter) some paint (leftover will do) tape and brush. Use your piece of furniture to plan out the lovely of your rainbow so it sits directly above it, and then use tape to invent what will become the gaps between each arch.
Paint between the masking tape order, let it dry and then remove the tape. You could also add a cute Describe ledge to sit in the middle of your originate and display some cute prints or books.
20. Turn an Ikea cabinet into a retro beauty
We love the texture of this cabinet and you would never know it was a simple IVAR cabinet – and the hack is so easy too! @treehousethreadsblog's Ikea hack was inspired by @hotpinkpineapples project, and you can check out her video for the full step-by-step, but essentially it's all done with half-round trim.
21. Make Ikea furniture 'vintage'
Love the look of apothecary cabinets but don't want to fork out for the real thing? This amazing Ikea hack by @diydanie is for you – all done with paint, some new handles and cute vintage style labels. One of the best Ikea hacks for vintage-looking affordable furniture.
Source


Comments
Post a Comment